Email Sender
Description
An Email Sender provides functionality to send emails to a remote mail server.
Creation
To create an Email Sender channel follow the steps described in the general description of Adapters.
Configuration
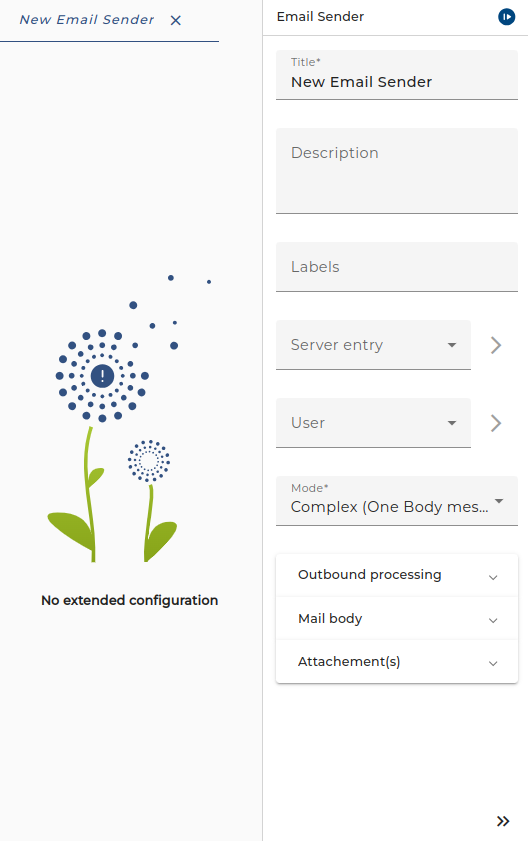
The dialog to configure the Email Sender looks like:
Step by step
-
Server entry - The mail server configuration. The server connection must before be created as environment entry (Email server connection).
-
User - Select the user to log in to the e-mail server. This user has to be created in advance in the security settings as credential.
-
Server URI - This value is generated based upon the selected Server entry.
-
Mode - Select the mode of the email message. Controls the number and type of arguments of the channel.
-
Simple: The e-mail body is given as text with optional variable references contained. A variable reference looks like $(variable-name). The variable-name then appears as parameter of the channel.
There are two variants of this mode: One with zero or one attachment and another with many attachments.
If you select zero or one attachment, the channel will have two additional parameters ATTACHMENT and ATTACHMENTNAME. The parameter ATTACHMENT contains a message whose content is serialized as mail attachment, the parameter ATTACHMENTNAME contains the name of this attachment.
If you select many attachments the channel will have an additional parameter ATTACHMENTS containing a message list.
-
Complex: The e-mail body is created by serializing a message. The channel has a parameter MSG containing the body message.
There are three variants of this mode: One with zero or one attachment, a second with many attachments and another with HTML message, Text message, images, Attachments.
-
-
Sender - E-Mail address of the sender. This value is the Sender header field of the E-Mail. You may use a variable reference here.
-
FROM - E-Mail address of the originator. If not set, the Sender address is used instead. This value is the Form header field of the E-Mail. You may use a variable reference here.
-
Reply to - optionally you may give here the reply to E-Mail address. You may use a variable reference here.
-
TO, CC, BCC - Comma separated sequence of E-Mail addresses of the recipients. You may use variable references here.
-
Subject - Subject of the e-mail. You may use a variable reference here.
-
Mail body - Configuration section for the email body
-
mail body - An optional text to appear in the e-mail body (only for simple mode). You may use variables within the text.
-
Default type - MIME type of the e-mail body. This value is also generated by selection serializer option and can be changed manually. For more detailed information about message types please refer to Message Types reference manual.
-
Serializer - Configure the Serializer to create the content from a message into body of the mail. For more information about serializers please refer to Serializer reference manual.
-
-
Attachement(s) - Configuration section for the email attachments.
-
Default type - MIME type of the e-mail attachment. This value is also generated by selection serializer option and can be changed manually. For more detailed information about message types please refer to Message Types reference manual.
-
Serializer - Configure the Serializer for attachments of the email. For more information about serializers please refer to Serializer reference manual.
-
Note: In the fields FROM, Reply to, TO, CC, BCC and Subject you may use variables in the same way as in the simple mail body. These will then be passed to the channel from the calling process model. For this purpose, simply put $(variable-name) in the field.
Setting addition headers
If you want to set additional email headers you must create a message which looks like the following example:
<?xml version="1.0" encoding="UTF-8"?>

<mail xmlns="urn:emds:mail">

    <Header>

        <name>x-tf-doctype</name>

        <value>pdf</value>

    </Header>

    <Header>

        <name>x-tf-msgtype</name>

        <value>arztbrief</value>

    </Header>

</mail>
When calling the email sender channel you then assign this message to the optional parameter HEADERMSG, e.g.:
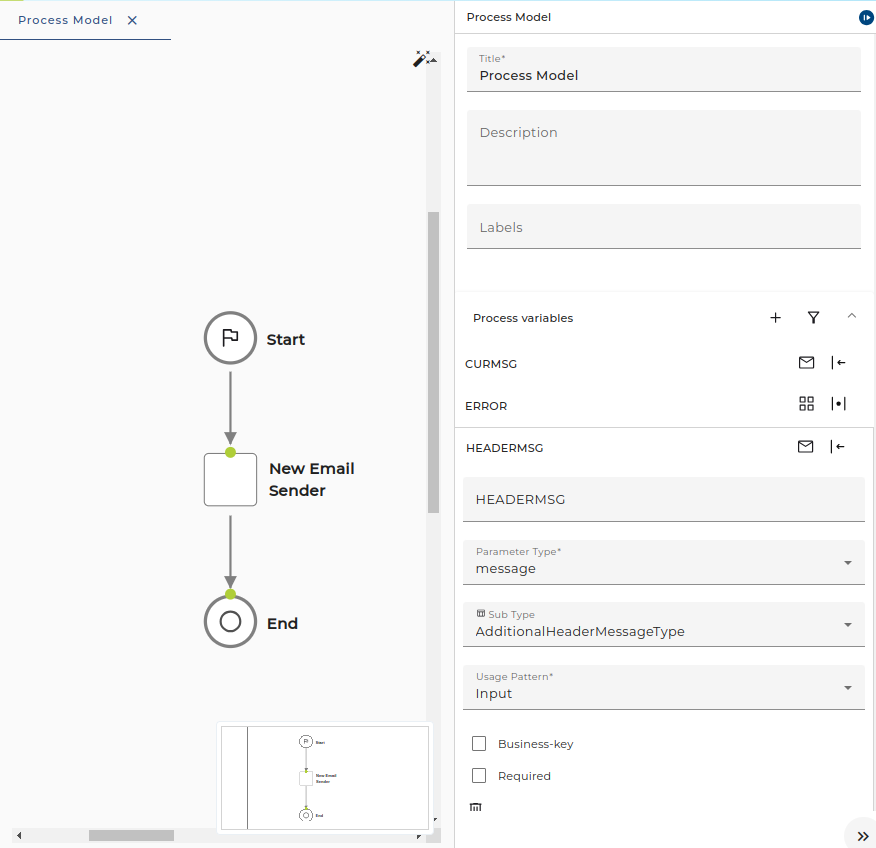
Assigning the optional header message
Testing the channel
You may test the Email Sender Adapter like every other outbound channel.
If the channel is configured, the user can test its functionality by clicking on the test symbol in the toolbar of the Designer.
Then a dialog opens showing the parameters of the channel. Set the required parameters and click the Test button to send the mail.